Wednesday, June 23, 2021

This Blog's Vegan Recipe List and Links

At-a-glance recipes I most-often use:
(will be updated as I add recipes to the blog)

Avocado Chocolate Pudding
Baked Potato w Beans and Cheese Sauce
Banana Bread
Beans, Greens, & Grains
Blanching (broccoli example)
Cabbage Rolls
Carrot Cake
Cheese Sauce
Chocolate Cream Pie (link fixed)
Frosting/Whipped Cream
Lasagna
Lentil Loaf
Baked Potato with Cheese Sauce
Mango-Banana
Mashed Potatoes and Gravy
Mashed Yams/Sweet Potatoes with Pineapple
Oatmeal (mush-free)
Potato Soup
Salsa
Stew: garbanzo beans, carrots
Stew: potatoes, peas, artichoke hearts
"Tuna Fish" Salad (mock)

Kitchen Snippets
Daughter's art-class assignment
was to make a color wheel.
She chose the rainbow of colors plant foods provide.
{Tangent: Have you heard the advice to "eat the rainbow?"
By eating a variety of colorful plant foods, you will get a
variety of phytonutrients both known and unknown}

Vegan Cabbage Rolls


We had a mini family reunion where my cousin, Katie, lovingly prepared this dish with my veganism in mind. It was SO good. I was going back for seconds and thirds...and so was everyone else. Everyone thought she made a vegan one for me and an animal-based one for everyone else.  Later she confirmed she only made the one plant-based dish. Family members were surprised and said they couldn't tell the difference. 🌱 💚   I brought left-overs home for my husband and kids to try, and they really liked it, too. 

Katie is a talented "some-of-this and some-of-that" cook. So I had to pick her brain for her "recipe." This is as close to it as I can get with the exception of using brown rice, jarred sauce and slightly different seasonings.

This turned out REALLY good (although not as good as Katie's!). This is a keeper. I wonder if a mashed chickpea filling or lentils would be a good substitute for the Beyond Meat. 

10" X 12" baking dish

Ingredients:
1 head green cabbage
3 cups cooked brown rice* ...I cooked rice in veggie stock
1 16 oz package Beyond Meat
1 jar marinara sauce** (about 20 oz...I bought a 32 oz jar but only used 2.5 c)
4 oz sun-dried tomato in oil***, diced (rough cut)
1/4 cup red cooking wine (eg Holland House)
1 cup onion diced
2 cloves garlic pressed (2 rounded T)
2-3 T fresh parsely
1/4 tsp chili flakes
1/2 tsp fennel seeds
1 tsp rosemary broken
1 tsp onion powder
1/2 T oregano
1/2 T basil
ground pepper

*Katie used parboiled rice (and she cooked the garlic cloves with rice then removed the cloves and chopped them fine)
**Katie made own sauce using 3 pounds of tomatoes: 2# San Mariano, 1# Margherita...Roma ok, too. She added 8oz jar sun-dried tomatoes, 1/2 c red wine, 1/2 sautéed onion, 4 cloves of garlic, rosemary, oregano, basil, s/p, red pepper flakes (seasonings I transferred to the filling instead). She cooked down the tomatoes (slow cook) and puréed them
***Could try dry sun-dried tomatoes (not packed in oil) and softening them in warm vegetable stock if wanting to lower oil content. (Make own sauce, too, w/o oil instead of jarred).

(Plus cabbage and rice)

Directions:
Cook rice
Core cabbage and cook:
    Instant Pot  Method
    2 C water in pot
    Place cabbage core-side down
        on trivet in pot
    High pressure 7 min
    Quick release
    Remove leaves
    Return tougher leaves to IP and heat for another 4 min
    (Total IP time is 15-25 min if cooking twice).

    Stove-Top Method
    Fill large stock pot halfway with water. Bring to boil. Add cabbage. After a few minutes start peeling     off leaves as they soften and drain them.

Slice off edge of center stem ribs to help roll leaves
(Need 16-18 leaves)


Filling:
In large bowl, add the rice, Beyond Meat, parsley, and seasonings.
Sauté onion and garlic
    -can sauté with oil from jar of sun-dried tomatoes OR
    -sauté using just water or veggie stock
Add the onion mixture to the rice mixture bowl

Sauce:
Pour jarred marinara into bowl and add the sun-dried tomatoes and red cooking wine

Pre-heat 325 degrees.

Assemble:
Lay cabbage leaf on surface in front of you with stem pointing towards you.
Put about 3-5-ish tablespoons of filling in the lower third of leaf.
Roll the stem-side of leaf over the filling and away from you.
As you roll at least one complete turn, fold over the sides of leave towards the center.
Finish rolling. Set aside on temporary plate seam side down.
Roll about 16-18 leaves. Slice remaining cabbage leaves. If there is filling left over, it can be used in next step.

Spoon a thin layer of sauce in baking dish.
Sprinkle the sliced cabbage leaves on top of sauce layer.
Sprinkle the remaining filling on top of the left-over leaves slices.
Place cabbage rolls in dish.
Pour sauce over rolls.
Optional: drizzle vegetable broth or just water along edges of dish
Cover snuggly with foil.


Pour sauce over rolls.
Optional: drizzle vegetable broth or just water along edges of dish
Cove snuggly with foil.

Bake at 325 for 2 hours 45 minutes.
(For the record, Katie baked at 350 for 3 hours)

______

Instant Pot Cooking Method Option
Insert trivet. Add 2 cups water for 8QT IP. Layer rolls on trivet with sauce in between. End with sauce on top. Close lid and seal it. Press Pressure Cook/Manual button. 20 minutes High pressure. Natural release for 15 minutes. (Turn on sound to help time things if needed). Then turn the steam release knob to Venting. {Tips from simplyhappyfoodie dot com}
______


Something Else I Didn't Know:  The US government subsidizes the meat, dairy, and egg industries with our taxes while not subsidizing fruits and vegetables...except for the plants produced for animal agriculture like corn and soy. This is why it seems like the produce section the grocery stores is so much more expensive than animal products. Lobbyists, advertisers and those at the top of industrialized animal agriculture are making the $$$ at our expense. It's difficult for smaller farmers to switch over to producing healthy foods for us when their income is better by supplying Big Ag.
Good news: We could solve world hunger with less acreage by phasing out animal agriculture and instead supporting farmers in growing fruits, vegetables, grains-for-people, nuts and seeds. We could then replant trees which were cleared to make way for the increased demand for animal agriculture...like the Rainforest which is being destroyed mainly for beef and other livestock. Wild horses would no longer be rounded up and killed for the sake of "grass fed beef." Water would no longer be contaminated from animal agriculture. Air would be cleaner. Diseases like heart disease, diabetes, colon cancer, hypertension, hypothyroidism, dementia, some kidney diseases, ovarian cancer, prostate cancer, breast cancer, many autoimmune diseases, ++ could be nearly eliminated.

Monday, January 6, 2020

Our Family's Favorite Carrot Cake Veganized!!


Our favorite carrot cake for years has been our modified version of "Sam's Famous Carrot Cake" from allrecipes dot com. I've managed to veganize it by eliminating the eggs and buttermilk, and it is fantastic!! Double the recipe for a layered cake. Next time I'll use oat flour to make the cake gluten-free. This uses a sifter; it may be fine without one. Click HERE for frosting recipe.

9" cake pan lined with parchment paper
Pre-heat oven 350 degrees F

Ingredients in sections this time according to steps of preparation:

In medium bowl, sift together dry ingredients:

1 cup whole wheat flour (I used white wheat this time)
1 tsp baking soda
3/4 tsp cinnamon
1/8 tsp nutmeg
1/8 tsp allspice
1/8 tsp salt

For egg substitute, mix together:
1. 5 T ground flax seed
3 T water

For buttermilk substitute:
5 T soy milk
2 tsp lemon juice
(can sub white or apple cider vinegar)
Stir together and let sit for 5-10 min to curdle


In large bowl, beat together:

the egg and buttermilk substitutes above
6 T light olive oil
3/4 cup of sugar (ideally natural, unbleached sugar)
1 tsp vanilla extract


THEN add the dry ingredients from the medium bowl to the large bowl and mix well.


In medium bowl, stir together:

1 cup shredded carrots (about 2), lightly coated with lemon juice
1/2 cup organic shredded coconut*
1/2 cup raisins*soaked in 2 T of warmed orange juice
1/2 cup pecan pieces
4 oz crushed pineapple, drained

Fold the fruit/veggie/nut mixture into batter


*Warm about 2 T of orange juice and soak raisins in it for a few minutes. You can do this at the beginning of the recipe, too, for plumper raisins.

If your coconut is dried out too much, add 1-2 more T of oj and soak the coconut in that, too. Start with the raisins, first, though.

Fruit, veggie, nut mixture.
The colors are beautiful!
The photo doesn't do it justice :(
Pour the batter into lined cake pan
Bake in pre-heated oven for 35 minutes
Check doneness by testing with toothpick poked in center of cake comes out clean
Remove from oven (turn oven off *cough*)
Let it cool completely before removing cake from pan
Line pan with parchment paper
(this helps to remove cake easily)


Get a cutie to sing Happy Birthday to you


Coconut Whipped Cream and Frosting


One batch yields about 3/4-1 cup, enough to top one 9" cake round.
If making a 2-layered cake, I would triple this recipe.
Instead of powdered sugar, which is mostly cornstarch, I grind granulated sugar into a powder.

This is a hybrid of two recipes from:
unconventionalbaker dot com 
and 
godairyfree dot org

Ingredients:
1 can (approx 14 oz) full-fat coconut milk (not the kind you drink from a carton)
2 T natural sugar ground into powder (I used a Bullet)
(If using powdered sugar, use no more than 3 T. Otherwise too much could make the frosting into a glaze)
1/4-1/2 tsp powdered vanilla (or 1/2 - 1 tsp pure vanilla extract)

Optional:
Lemon zest to sprinkle on top
1/4 - 1. 5 tsp Dr. Oetker Whip It Thickener/Stabilizer (Not needed if just making a whipped cream, but if you want the cream thicker to use as a frosting, then use it. Link to it HERE.

Directions:
-Chill can in refrigerator right-side-up. This usually puts the liquid on the bottom and cream on top.
-Turn can upside down and open the bottom. Pour out and discard liquid.
-Scoop cream into mixing bowl. Beat about 1 minute.
-Add in sugar and vanilla. Beat on low to incorporate.
-If needed, add thickener. Beat until combined.
-Cover and refrigerate up to 3 days. It will thicken more as it chills


I promise that's not rust on the zester.
It's that color because I use it to zest turmeric, too.

Chill right-side up.
Open upside-down.
Pour liquid out (discard liquid)


That's about 3 T granulated sugar before and after.


Friday, November 29, 2019

Conversion Chart Discrepancies

I just discovered while posting my cheese sauce recipe that the conversion charts I've been using to make the recipes metric-compatible aren't true-to-experience at least for the dry measurements. For example, as I convert from cups and tablespoons to grams, the grams are way higher from these charts than what my kitchen scale shows I'm actually using. Ugh  I'm going to have to go through recipes and indicate if they have been "verified by my kitchen scale" or not. I also mentioned this on the conversion chart I've posted on the sidebar. {Sorry, Marie!!}
Photo credit: Hannah Hooper, LadyGrouplove

Monday, November 18, 2019

Baked Potato with Vegan Cheese Sauce

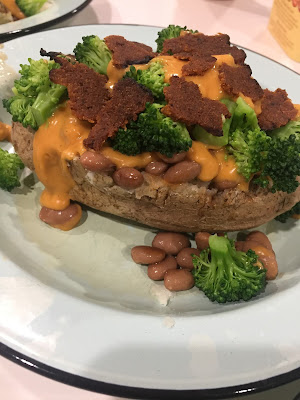
Simple, yummy, filling, nutritious, high-fiber, guilt-free meal. Baked potato with chili beans, blanched broccoli, vegan bacon, and plant-based cheese sauce (link HERE).

-Wash potatoes. Place in 350 F oven. Cook for about 75 min. (There's probably a quicker way that I haven't learned, yet).
-Open can of chili beans, pour into small sauce pan, and heat over medium heat
-Cut rinsed broccoli into bite-size pieces and blanch (click HERE) in boiling water for 2 min. Drain.
-If using vegan bacon, follow directions. (Mine needed to be thawed, then cooked for 2 min each side on pan
-Slice skin off from top of potato. Mash the inside. Pour on hot beans with its own sauce, then top with cheese sauce, broccoli, and vegan bacon...or whatever toppings you are craving :)


Bacon tastes good because of the salt and fat (and sugar) combination
our tastebuds crave (pig meat doesn't taste good without those things).
As I was cooking this plant-based version, my husband and son
came in a said it smelled like bacon. They liked the vegan bacon.
It's good in a sandwich. It doesn't have the same texture
as pig bacon. When I knew how much the young pigs suffer,
it was easy to give up pig bacon. Additionally, pig bacon is a
Class-1 carcinogen...bad news for our body, the pig's body,
as well as the environmental damage from animal agriculture.

Vegan Cheese Sauce for Mac-n-Cheese, Nachos, Potatoes, Veggies, Enchiladas, Fondu, etc


Updated 11-29-19: This is the version I like the most and tastes more like cheese sauce than the original recipe. (I took a screenshot of the original and posted it at the end). Changes made: I halved the recipe, included more seasonings, increased salt, and reduced cornstarch ratios. This is super-yummy. I made nachos last night: corn chips, this cheese sauce, chili beans, salsa, green onions...they all loved it!

Updated 6-23-21: Ground chia seeds is more user-friendly than cornstarch. I added cumin and chili powder, too. Yum!

Gluten-free, nut-free, fat-free, non-dairy, good fiber, nutritious.
This makes at least 3 cups and is around 455 calories for all 3 cups!
(1 c oats = 300 cal, 1/4 c nut'l yst flks = 70 cal, 1 T cornstarch = 35 cal, 6 oz bell pep = 50 cal)
Compare this to dairy cheddar cheese sauce: 1,320 calories for 3 cups (plus saturated fat, high sodium, casein, and other undesirable content like hormones, pus, blood. It also has no fiber.)

Equipment needed: high-speed blender is optimum (although others have used a regular blender/processor then heated mixture in pan on stove)

Ingredients: (conversion verified with my kitchen scale)
1 cup (95 g) rolled oats
1/4 cup (19 g) nutritional yeast flakes 
1 T (9 g) cornstarch chia seeds, ground
2 tsp (5 g) onion powder
2 tsp (10 g) salt {2 may be too salty. Try 1.5 next time. 1 tsp not enough imo} (or 1 tsp Braggs)
1/2 tsp (? g) garlic powder
1/4 tsp (? g) smoked paprika
1/4 tsp (? g) curry powder
6 oz. (150 g) Roasted Red Bell Peppers in water (from jar)
1/2 T (7.5 mL) lemon juice
1/8 tsp (0.88 mL) liquid smoke
2 cups (0.5 L) warm water (I microwaved it for 1:40 minutes)
edit add:
1/4 tsp cumin
1/8-1/4 tsp chili powder (1/4 is pretty spicy)

Directions:
(If you have a larger jar of roasted bell peppers like I did, measure out 6 oz and include liquid, just enough to cover the peppers).
-Put all of the ingredients in a high-speed blender with the ability to cook food
-Blend on high for about 2 min 45 sec (if your water is cold, blending will take a lot longer)
 - - Stop blending once the sauce begins thickening and motor changes noise. It will continue to thicken as it cools
-Transfer to a large container that can hold at least 3 cups

To re-heat:
Jill suggests to put the desired amount in a microwavable container and put 2-3 tablespoons of water or plant milk on top. Don't stir it in, just let it sit right over the cheese sauce so the top doesn't over-heat and get gummy.  Example reheat time: 1/4 cup sauce for 1 min at 80% power. Stir after heating.

Nachos: I added chili powder to the cheese sauce
So goooood!
Cheesy pasta- Yum!
 Oats, roasted bell pepper, nutritional yeast flakes,
corn starch, water, liquid smoke, lemon juice,
onion powder, smoked paprika, garlic powder, salt,
pepper, curry powder, happy cow


To thin for mac-n-cheese, I added plant milk
but didn't stir until after heating in microwave


Something else I didn't know:
Consuming dairy can increase breast cancer risk as much as 50% (link). There's also an increased risk of prostate cancer as well as a possible connection to Type 1 diabetes (link).
The good news:
We do not need animal milk to survive. Our health is better without dairy. (And the cows and planet are better off without the dairy industry).

This is a screenshot of the original blogpost of Jill's
original recipe. It's a good foundation to use and
customize. It's really thick, which might be good
if you are going to slice and reheat it in a sandwich
or quesadilla (I haven't tried either, yet). I mostly
use it as a sauce. I figured if I'm going to keep
thinning it anyway, I might as well not make it so
thick to begin with. I may even reduce the cornstarch
more down to 3/4 T.