Tuesday, December 21, 2010

Brussels Sprouts and Chestnuts

Kid Rating:  2 out of 3 really like it (the third needs time to get used to it)
Do Again?  Yes, but maybe without the chestnuts

This recipe is adapted from my antique cookbook.  I had purchased chestnuts at two different times, the second because I thought I could use a little more.  I stored them two separate ways.  Apparently, one of the ways was the wrong way, but I didn't know this until after I cooked them together and half the batch showed spoilage upon opening them.  Here is a link on how to store chestnuts:  click here.

There aren't as many steps as I make it look like; I just really spell them out.


Ingredients:
chestnuts
Brussels sprouts
salt water (*recipe for a brine solution on bottom)
butter
salt (I used Kosher)
pepper


Step 1A - Chestnuts -- This could also be a do-ahead step but within 24 hours.
Put chestnuts in pot of cold water.
Bring to boil (it took mine 10-15 min) - (Start Step 1B while waiting for it to boil)
Boil 5 min. (Shell should be soft).
Drain.
Cut and pull apart.  I cut mine in quarters to make it easier to pull nut out.

Step 1B - Brussels Sprouts
Trim stem to base.
Pull off wilted/yellowed leaves.
Cut "X" on bottom 1/2 inch deep.
   ....screeeeeetch -- stop -- that's what I started to do.  The "X" may be good enough for small Brussel sprouts, but I was cooking large ones this time.  So, I changed my mind.  Experience tells me to cut them in half instead.
Cut large sprouts in half.
Soak in salted water* for 10 minutes. (Start another pot of water boiling).
Drain sprouts from salted water.
Put sprouts into boiling water, return to boiling and boil 10 minutes.
Drain.

Step 2
Pre-heat to a "moderate" oven, which I interpreted as 300 degrees F (love these old cookbooks).
Spray baking dish with cooking spray or just rub vegetable oil on bottom of dish.
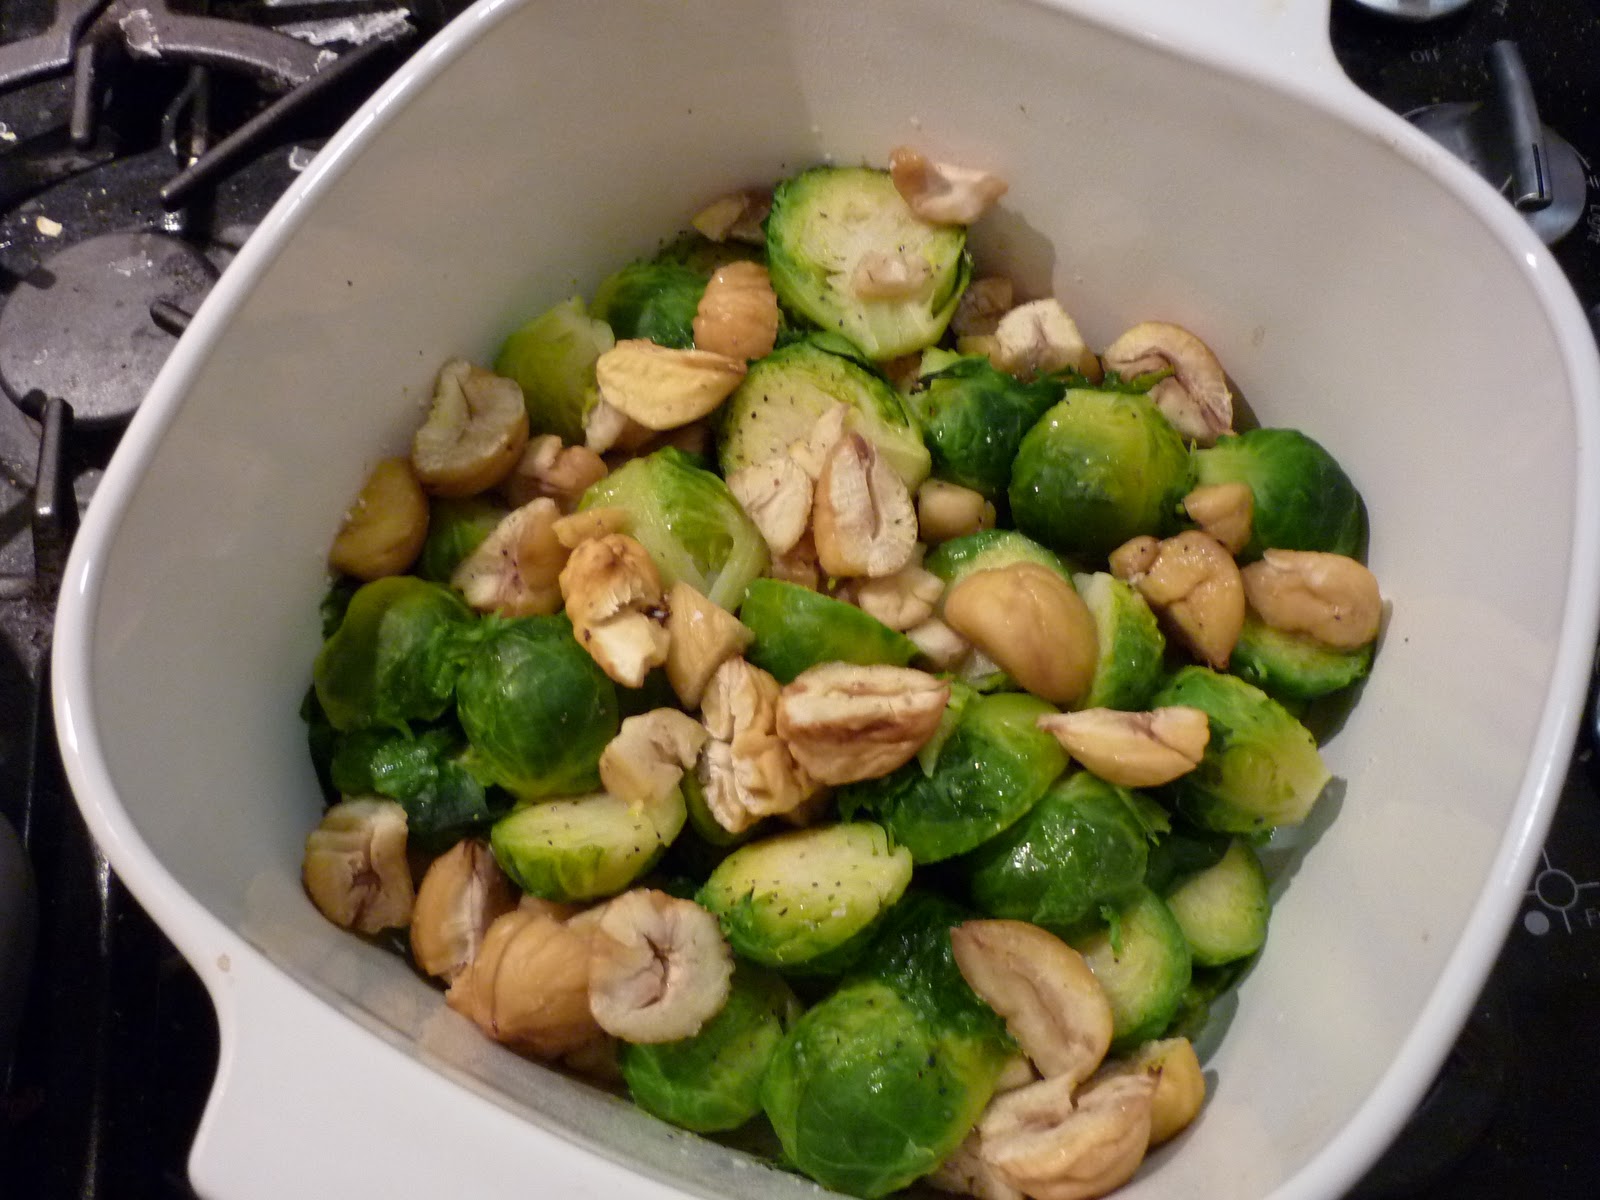
Layer dish with a portion of Brussels sprouts, chestnuts, dot with butter, salt and pepper.
Repeat with more layers.  (I only had enough for 2 layers).
Put a 1/4 cup of water into dish to "moisten."
Bake 30 minutes uncovered.


Chestnuts boiling on an open fire.
1/2 inch deep "X" -- better for smaller sprouts
Cut larger sprouts in half.
Soak in salt water*
Cut chestnut shells in halves or quarters to open
and peel.
Chestnuts.  It should have been twice as much.
Live and learn.
First layer.
Second layer.
I'll use a smaller dish next time.
Add 1/4 cup of water.
30 minutes later.
*Brine Solution - 1 Quart
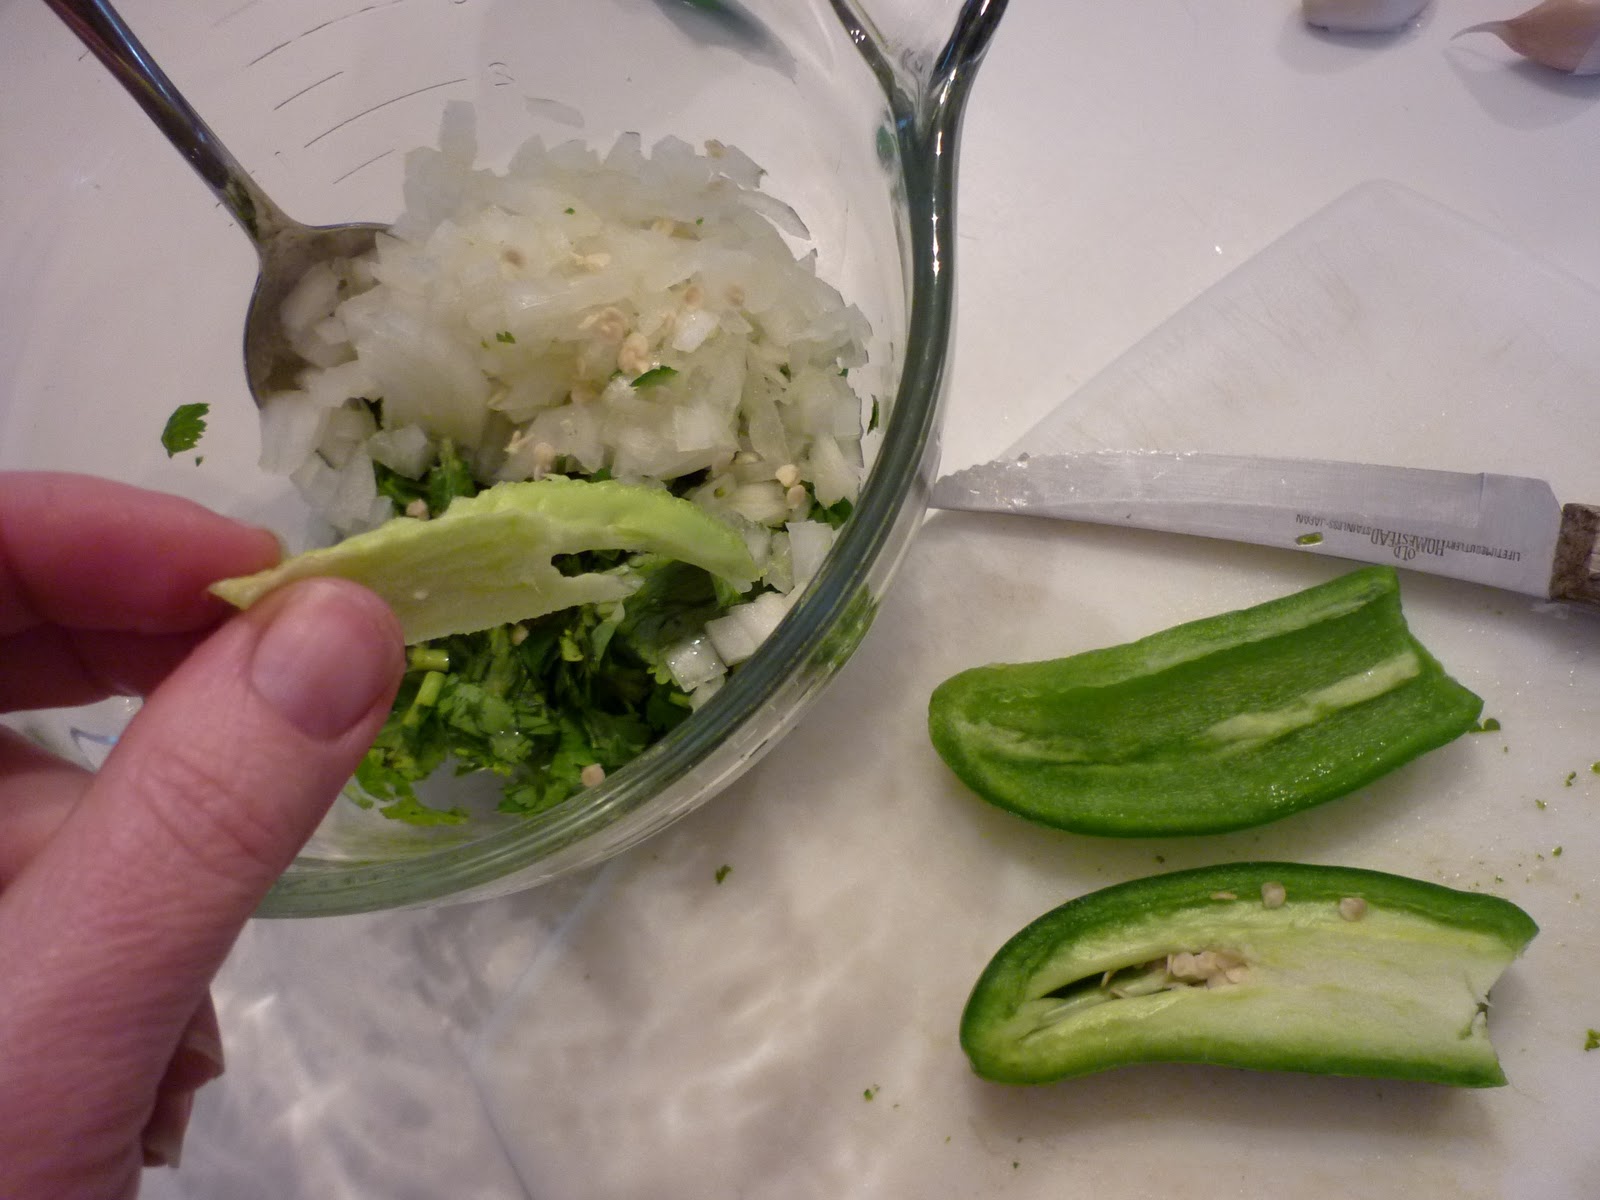
I keep 1-2 quarts of brine (salt water) solution on hand in the refrigerator.  I use it as a marinade for meat to keep the meat from drying out during the cooking process.  The salt helps draw the water into the muscle cells while marinating.  Anyway, when the cookbook asked for salt water for the sprouts, it didn't give a ratio.  So, I just used the brine solution, and it worked out nicely.

Boil about 1-2 cups of water.
Add 1/4 cup of salt.
Stir until dissolved.
Pour into cold water so the combination equals 1 quart (=4cups).

Family Review:
11 y.o. -- Brussels sprouts were good, not crazy about the nuts.
9 y.o. -- "I LOVE Brussels sprouts!  The nuts are okay."
5 y.o. -- (Not used to it, yet.  Hates it before trying it.  Determined to continue hating it.)
Hubby -- "Best you've made so far.  They don't smell like Brussels sprouts.  Juicy, not too strong."
Me -- I liked them a lot.  Some of the nuts were really good, others not so much.  That could be from my poor storage although I thought I tossed all the bad ones.

I'll definitely make the sprouts this way again and will try the chestnuts with them next holiday season.

Saturday, December 18, 2010

Salsa (Red, Medium)

Kid Rating:  2 out of 3 like it
Do Again?  Yes

This is an adaptation from two different recipes from two different friends.  It's soooo good and versatile. {Update: this recipe has won a salsa contest (small contest ;) }

Ingredients:
1 -- 8 oz can of tomato sauce
1 -- 14.5 oz can of diced tomatoes (I like fire-roasted)
(About the tomatoes:  If you have fresh, flavorful tomatoes available to you, use them instead.  Yum!)
1/2 onion chopped (I chop them finely so they are less overwhelming to the kids)
2 cloves garlic pressed (I've used garlic powder before)
1/2 bunch of cilantro chopped (leaves and stems -- the stems are so flavorful)
1 jalapeño pepper*
few shakes of cayenne pepper sauce 
1/2 tsp lime juice
1-2 tsp sugar
1 tsp salt
black pepper
Update: add 1/4-1/2 tsp liquid smoke


Chop cilantro.

Add lime to cilantro and stir.

Add onions and jalapeño pepper.  The seeds are the
hot part.  I cut out the pith then scrape the seeds
into the mixture.  I discard the pith and chop the
rest of the pepper.

Add the remaining ingredients.  Stir.


Options:
Put the salsa in the blender for a smoother texture.


*Experiment with different peppers.  Here's a guide from my friend, Wes:
Mild Salsa -- 1 Anaheim pepper
Medium Salsa -- 2 Jalapeño peppers
Hot Salsa -- 1 Habinero and 1 Jalapeño


Family Review
5 y.o. -- Didn't give to him; it's probably too hot.
9 y.o. -- Liked it (good flavor -- not used to the heat -- digs in when it's more mild).
11 y.o. -- Liked it a lot.
Husband -- It's a favorite.
Me -- Love it.

Thursday, December 16, 2010

Antique Cookbook


I'd like to introduce you to one of my treasures, something I would miss if it was lost in a fire: The Settlement Cook Book: The Way to a Man's Heart, 1931. I've had it for about 20 years and got it from an estate sale. My parents were renting the home of the estate sale for a short duration, and the owners said we could have first dibs. I found this.


What I love about this book: it's before food processing, convenience foods, fast-foods, fake foods, and even plastic containers. It's written before the era of when food became the enemy and something to conquer. Food was a way to life and something to be enjoyed.


There is a section (2 pages) about calories. It says men need 2200-4000 calories per day, and women need 2000-3000. (That's not too far off; SparkPeople say 2700 and 2000 respectively). There's nothing about dieting or "watching" calories.


Preparations in this book are from scratch, even the cream-of-whatever soups (did you know that at one time they didn't come in cans?). Here's the section on preparing a chicken, and it doesn't include opening a can or defrosting:


The book also includes home care: airing a room (pre a/c), removing stains, washing dishes, lighting wood/coal/gas ovens. Here are some other "How-to's" of the period I found interesting.


P. 14 -- How to make soap (grease, lye, water, borax, salt, sugar, ammonia)
P. 35 -- Preparing foods for infants
p. 39 -- Egg Nog (I make this often - SO good and healthier than store-bought
P. 192 - Squabs (aka pigeon)
p. 198 - Venison, Rabbits
p. 213 - Chayote, Dandelions ... DANDELIONS!!


And because this is a veggie blog, I'll share what the first sentence of Chapter XVI "Vegetables" says, "Vegetables of all kinds and especially the green, leafy varieties, are rich in that something called 'vitamins' and should be used freely to promote the health and prolong the life of the family." I like the part, "in that something called vitamins."


In the back of the book are advertisements of the "latest" products and equipment. Check out this stove:


Thanks for going back in culinary history with me. This is my go-to book, especially for cooking vegetables. Sometimes the instructions are vague ("put in moderate oven"), but I feel connected to it. I'm thankful for some modern conveniences as I think of the cooks 80 years ago reading the same pages in their kitchens. I appreciate my gadgets and appliances. But, along with modern conveniences including cooking blogs and recipes on the internet, I'm still thankful for this book.


Update: My mom found this info about the book and its author, Lizzie Black Kander, on Wikipedia:
Lizzie Black Kander (1858–1940) was the founder of a settlement house in Milwaukee, where she originated The Settlement Cookbook. [1] She was born in Wisconsin to GermanJewish immigrants. In 1896 she founded the Keep Clean Mission at B'ne Jeshurun Temple in Milwaukee to help educate young Jewish girls to assimilate to a more mainstream American way of life. This was followed by the similarly conceived Milwaukee Jewish Mission at Emanu-El Guild Hall. In 1901 she moved her work to The Settlement, on North 5th Street. (Charitable social work among immigrants was often called "settlement work" at that time.)
Once of Kander's aims was to teach young girls to cook and keep house. As she later recounted, her students spent a lot of time copying recipes from a chalk board, so she decided to print the recipes in the form of a cookbook to save them time. Writing as "Mrs. Simon Kander" (after her husband's name), she compiled a 174-page collection of recipes, household hints, and advice on housekeeping. None of the local Jewish religious organizations would help her fund the project, but the husband of one of her female friends was a printer, and he agreed to undertake the work, which was supported by selling advertisements. Although the complete title of the book was The Way to A Man's Heart ... The Settlement Cook Book, it is generally known as The Settlement Cook Book.
The first Settlement Cook Book was published in 1901 and its 1,000 copies sold out within one year. It was greatly expanded and reprinted on a regular basis, and funds from book sales allowed The Settlement, of which Kander was the president, to buy land on North 9th Street in 1910 and to erect a new building there in 1912. The Settlement Cook Book proved so popular that 34 subsequent editions—totalling 2 million copies—followed the original edition. The third edition of 1931 is probably the most popular with cookbook collectors.
What sets The Settlement Cook Book apart from other recipe books of its time is the fact that Lizzie Kander, while trying to help foreign girls become "good Americans," also assembled the first and largest collection of ethnic Jewish and German recipes ever published. Her simple, intelligent, and straightforward authorial style marks the early editions of the work, and her willingness to publish as many as five or six variations of a simple cookie or torte recipe made the collection a unique slice-of-life glimpse into Jewish American cookery of the early 20th century. Kander wrote and edited the book until her death; afterwards it was revised by members of The Settlement Cook Book Company. It has remained in print for more than 100 years, both in current revisions and in facsimile reprints of earlier editions.

Wednesday, December 15, 2010

Peanut Butter and Celery

Kid Rating:  3 out of 3 like it
Do again?  Yes

Wash celery.  Dry it (pb sticks better when it's dry).
I used 100% natural smooth peanut butter
I cut the celery into bite-sized pieces for the 5 year old (added pb after cutting).

My kids also like it when cut the celery into 1 inch lengths and break pieces of crackers and stick them into the top and make little "sail boats" out of them.  Takes too long.  :-p  I let them do it.

Thursday, December 2, 2010

Pumpkin Pie from Scratch

Kid Rating:  2 out of 3 liked it (my oldest never was a pumpkin pie fan and didn't try it)
Do again?  Yes, but I would bake and puree the pumpkin in advance
Isn't it pretty?  (Photo was taken by my 5 year old).
It was a gift to my parents from their friend.
The little pumpkins are from our garden.
The leaves are from our yard.
This recipe is a hybrid from two different recipes:  one from Betty Crocker's Cookbook (1986) which calls for canned pumpkin and the other from The Settlement Cook Book (1931) which is vague and dated in some areas (I love this old book!  I'll do a post about just this book sometime).


1.  Bake the pumpkin
a.  Pre-heat 350 degrees F
b.  Wash and cut in half, crosswise
c.  Scrape out seeds and stringy parts.
d.  Place in shallow pan, shell side up
e.  Bake until it begins to fall in and is tender -- for this size, it baked for 1 hr 40 min.


2.  Puree pumpkin (how I did it -- there may be an easier way)
a.  Cut off burned edges.
b.  Scrape out pulp or cut away skins from pulp.
c.  Mash pulp in bowl.
d.  Resolve to save up for a food processor.
e.  In the mean time, puree pulp a small amount at a time in the blender.  DO NOT ADD LIQUID.


I put foil on stem to keep from burning.


Clockwise from left:  baked pumpkin, mashed pumpkin,
pureed pumpkin, the needed 1 1/2 cups.
I put 1 1/2 cups worth of pumpkin in bags to freeze.
Each HALF of this pumpkin yielded 6 cups of puree,
which is enough for 4 pies.
PIE RECIPE
9 inch pie plate lined with plain pastry dough (recipe on bottom)
Pre-heat 450 degrees F
Mix in this order:
1 1/2 cups pureed pumpkin (which equals 16 oz -- about the size of canned)
1/4 cup sugar syrup (recipe on bottom) or store-bought corn syrup
1/4 cup brown sugar
2 eggs
1/2 tsp salt
1 tsp cinnamon
1/2 tsp ground ginger
1/8 tsp cloves
1 can evaporated milk (15 oz of milk should be okay, too)


Put pastry-lined pie pan on oven rack.  Pour pumpkin filling into pie pan. (Pouring after helps reduce carrying, balancing, and potentially spilling the liquidy product).
Bake @ 450 degrees for 15 minutes, then
Bake @ 350 degrees for 45 minutes (until knife inserted in the center will come out clean).

450 degrees F for 15 min
350 degrees F for 45 min


Family Review:  All (but Thomas) really liked it.  Some said it was better than store-bought.

Sugar Syrup (A substitute for corn syrup)
2 cups of sugar
3/4 cups of water
1/4 tsp cream of tartar
dash of salt

Put all into a sauce pan and boil.  Reduce heat to simmer.
Cover for 3 minutes (removes crystals from side of pan).
Uncover and cook until the "soft ball" stage, which I never got to but stopped after 20 minutes, stirring often.
{Cool and store at room temp up to 2 months}

Plain Pastry  (I was also making a pecan pie.  This recipe is supposed to make two pastries, but I found that I didn't have enough for the deep dish and had to improvise.  This is what I started with, though).
1 1/2 cups of flour (I had 1 cup white and 1/2 cup whole wheat)
1/2 tsp baking powder
1/2 tsp salt
Mix those together.
Work 1/3 to 1/2 cup of butter into the flour with fork, pastry blender or finger tips -- lightly, the less handled the better.
Add 1/4 cup cold water very slowly, enough to hold dough together (do not knead).
Divide into halves.
I didn't roll it out but instead pressed it directly into the pie pan with my fingers and smoothed it with a special pie pan roller.

Sunday, November 28, 2010

Roasted Brussels Sprouts Revisited

Kid Rating: 2 out of 3 like it (You guessed it; the 5 y.o. is the one who didn't, as usual).
Do, again? Yes!


Thank you, Anna and "Utah Mommy" for the helpful hints you left in the comment section of the first "Roasted Brussels Sprouts" post. (Click here to see it). And thank you Aunt Terri for the variation -- I'll be trying that, too, now that I think I have the basic recipe down.


"Utah Mommy" tried my suggestion to cut the sprouts in half and shared her results:


"We tried this tonight. I cut them in half like you suggested and thought that made a big difference. I also probably cut off a little more of the stem then what should've been, but I think that's the part that makes them bitter.

Anyway, we did have to "stir" instead of roll, and I probably only stirred them every 10 minutes instead of every 5. I think they ended up cooking for about 45 minutes, but I think they would've been fine at about 35 minutes. Two people in our family thought they were a bit over-cooked.

Anyway, I think this one is a keeper. It's the only way I've found so far where everyone said that they would eat them again, even though our 8-year old wasn't completely sold. The 18-month old ate them though!!!"

Monday, November 8, 2010

Blanching Technique Using Broccoli

Kid Rating: 3 out of 3 like it
Do Again? Yes

About 10 years ago, my friend Karrie introduced me to blanching. I was at a pot-luck where broccoli was being served with dip. I usually avoid raw broccoli, but these had a beautiful color, so I tried one. It was SO good!

"Who brought the broccoli?" I called out. It was my neighbor and friend, Karrie. By the end of the event, her broccoli was gone (by others, not just me).

I've been serving blanched broccoli since. My kids love it, and here's a video to prove it. Even neighbor kids like it. We had one little girl over for dinner. When her mom asked what she ate, I told her broccoli and whatever we had that night. Her mom was shocked. "She hates broccoli! But I always serve the frozen stuff and it's mush."

Enough chit-chat. You can also use this technique with green beans. I'd like to try it with cauliflower.

Get a pot of water boiling.
Rinse off broccoli.
Trim off the florets.
Trim the stems, too. (My daughter loves this part of the broccoli).
Put the broccoli in the boiling water for 2 minutes (longer for more tender).
Strain. Rinse with cold water to stop cooking process if you are serving it cold. (It's also good warm).

Top: before blanching
Bottom: after blanching: brighter, easier to chew, sweeter
Cheat method: If I'm short on time, I dip the broccoli
in boiling water and hold it there for two minutes,
then cut off the florets.

"Poor man's asparagus," called by the French.
The inside of the stem is good, too. Just trim off
the tough outer edges.
Trimmed florets and stems.
Boiling for 2 minutes.
Remove (I have to get strainer insert).
I want to save the water; that's why I'm not
just dumping it all through a sieve/strainer.
I often use the same water for cooking pasta or rice.
The water has nutrients that were cooked out of the
broccoli, and the pasta/rice can soak some of that up.
Look at that beautiful color.
Not too bitter.
Not too hard.
Not too mushy.
Just right.

Wednesday, November 3, 2010

Five Personalities of Fruits and Veggies -- "Borrowed"

Hi! I'll be coming back soon. I checked in with Amy at SuperHealthyKids.com and saw this great post and stole borrowed it to post over here to keep the info handy.


I liked how she says to not get hung up on the technicalities of where fruits and veggies come from. Here is the link to her post, and the following is what I cut-and-pasted from it:


Fresh is best, but it isn’t always possible. We are moving into the season where it’s not easy to find the fresh fruits and vegetables that lined the grocery stores only three weeks ago. I wanted some strawberries yesterday, and was even willing to pay a little extra for them, considering they aren’t in season, but I couldn’t even find any! My local grocery store didn’t have one fresh strawberry in the entire store! So, while we love to eat fresh fruits and veggies, I get asked often if the alternatives are healthy for you.
One thing that used to bug me when I was working was to have someone hear that canned fruits and vegetables aren’t good for you, so they don’t eat them. And for some reason, they don’t eat ANY fruits and vegetables. To make it worse, I’ll see them grabbing candy bars out of the vending machine! I’d much rather see you eat some vegetables from a can, than pull a candy bar from a vending machine. Can you see the irony?
So, here are the alternatives, and their benefits/ or downfalls!

FRESH

  • If you can get it, fresh always tastes better! TJ does not care for frozen green beans, or canned green beans, but loves fresh ones! Experimenting in this way can help you find what they like. A bonus, is that fresh (especially if picked when ripe) is going to have the most nutrients available.
fresh peaches

FROZEN

  • Second in order of healthfulness is frozen. I love frozen! Although for some items it may not be as tasty, frozen is convenient, it doesn’t have to be washed, its cheaper, it’s usually picked at the peak of ripeness, and you can eat it all year long!!
  • Frozen has as many, if not more nutrients than fresh because farmers (or you) can pick the produce when it’s the ripest and then flash freeze. Often, when we get fresh produce at the store, it’s picked before it’s ripe so it can make the travel to the store before it spoils. We love frozen!! (did I already say that?) If you are buying frozen however, watch to see if they’ve added ANYTHING like salt or sugar!

CANNED

  • The vilified category of the group.. canned. People love to trash talk canned vegetables and fruits, why? Because the added salt, the sugar, the BPA, the cooking and canning process itself. But hey, no need to discount a perfectly fine method of getting your 5 a day. Just be smart! Read labels! Don’t go withoutproduce just because you think canned is bad. My stance on BPA… it’s not a priority on my list of concerns. If I can find BPA free, I’ll choose it. If not, we aren’t going to go without peaches all winter, because my higher priority is to get enough fruit and vegetables.

DRIED

  • Dried fruit is perfect for kids. It’s portable, convenient, and super high in nutrients and fiber. Again, check labels.. we love dried mangoes and dried cranberries, but most brands add sugar. Good choices are the Stretch Island Fruit Leather (no sugar), raisins, dried apricots, and dried apples.
sweet potato chips

JUICED

  • The only downside to getting your produce in juiced form is the absence of fiber. Juiced fruit is a huge dose of sugar (even if it’s fruit sugar), but without the fiber to slow the absorption of the glucose into your blood. However, juiced does have a concentrated amount of micronutrients, and therefore can be consumed in moderation.
JUICED
So, the bottom line. Although fresh is best, there is a place for all forms of fruits and vegetables in a child’s diet. Kids age 2-8 need 2-3 cups of fruits and vegetables per day. The point is to get them to enjoy a variety of fruits and vegetables and not to get hung up on technicalities.
(Thanks, Amy).